A jailbreak for iOS 11.0 to 11.1.2 was just recently released to the public. With this, lots of people will want to make sure they remain on whichever iOS 11 version they are currently running. This does, however, present one problem. Once you jailbreak your device, it becomes much more difficult to safely restore it to factory settings without updating. This is due to modifications that are made by jailbreak apps/tweaks that won’t be undone simply by using ‘Erase all content and settings’ in the settings app. That is where you may need Prometheus.
Prometheus (AKA futurerestore) is a tool created by tihmstar which allows you to restore to unsigned iOS versions as long as you have SHSH2 blobs saved for them. It does, however, require you to already be jailbroken, or using an exploit to set some values before you will be able to use it. This does, unfortunately, mean you won’t be able to use it to downgrade iOS 11.2 or above to iOS 11.1.2 (at the moment). If you are currently running iOS 10 jailbroken, and want to update to iOS 11 to jailbreak, you can follow the guide linked here.
This tool is quite complicated to use, but as long as you do everything correctly, you can restore an iOS device to an unsigned iOS version. The tool is currently only compatible with macOS and Linux, but Windows support should be coming in the future.
It should be noted that this will only work while Apple is signing iOS 11.2.6 (or a newer version that has a SEP compatible with iOS 11.1.2). This means that when future versions of iOS are released, you may not be able to use this method to restore back to iOS 11.1.2. This method also requires that you have valid SHSH2 blobs saved for iOS 11.1.2. If you do not have these saved already, it is too late to save them as Apple no longer signs iOS 11.1.2. You should always save SHSH2 blobs for every iOS version. It is also worth mentioning that if you do not have SHSH2 blobs for iOS 11.1.2, you will not be able to use someone else’s, as these blobs are specific to each device.
Requirements & Notes
- This restore requires you to have SHSH2 blobs saved for iOS 11.1.2. If you do not have them saved already, you cannot do it anymore as iOS 11.1.2 is no longer signed by Apple.
- This tool is currently only compatible with macOS and Linux. Official Windows support should be added at some point. If you are using windows you can install a macOS virtual machine.
- When using this method to restore to iOS 11.1.2, Touch ID WILL work. Sometimes when using this method Touch ID wouldn’t work after the restore, but iOS 11.1.2 and iOS 11.2.6 have the same SEP, so Touch ID works perfectly.
- This restore should work with all 64-bit devices as long as you have valid SHSH2 blobs for iOS 11.1.2.
- This will restore your device and erase all data on it. Make sure to backup in iTunes if you want to keep any data on your device.
- This exact method will only work while iOS 11.2.6 is being signed by Apple, however, it is possible to tweak it if you use files from the latest IPSW file instead.
- If you get any errors with futurerestore or have any questions, please read this post before asking for help.
Download Links
- futurerestore – Mac / Windows (Experimental. Use at own risk)
- iOS 11.2.6 and 11.1.2 IPSW Files
- NonceSet1112 IPA File
- Cydia Impactor (Windows / Mac / Linux 32-bit / Linux 64-bit)
Written Guide
- Download the NonceSet1112 app from the link above and save it somewhere. Then download the latest version of Cydia Impactor (a program made by saurik) for your operating system from the links above. Version 0.9.35 minimum is required. Extract it and open the ‘Impactor’ file.
- Once it opens, make sure your iOS device is plugged into your computer. Select your device in the drop-down menu.
- Find the NonceSet1112 app IPA file you downloaded earlier and drag it into the Cydia Impactor tool. If a warning appears, click ‘OK’.

- You will be asked to enter your Apple ID. This is used only to create a certificate for the NonceSet1112 app to be installed and will not be visible to anything other than Apple’s servers.
- Once you have entered your Apple ID and password, click ‘OK’. The NonceSet1112 app should now be installed on your device.
- Once the NonceSet1112 app is installed, open Settings and navigate to General>Profiles & Device Management and find the NonceSet1112 app profile (should be your Apple ID). Open it and click ‘Trust’ twice.
- Create a folder on your desktop called ‘Downgrade’. This is where we are going to keep all of the files needed to restore. Keeping everything in one folder makes it much easier to work with.
- Download the IPSW files for iOS 11.2.6 and iOS 11.1.2 from our downloads page here and save them in the ‘Downgrade’ folder you created. Make sure to select the correct IPSW’s for your device.
- Download the latest version of ‘futurerestore’ from here and save it in the ‘Downgrade’ folder you created. Extract the ZIP file and make sure the ‘futurerestore_macos’ file is present. Move the ‘futurerestore_macos’ file to the main ‘Downgrade’ folder. You can delete the ZIP and all other extracted files at this point.
- Once the iOS 11.2.6 IPSW file has finished downloading, right click on it and click ‘Rename’. Add ‘.zip’ onto the end of the filename to convert it from an IPSW to a ZIP file. You will get a pop-up asking you which extension you want to use. Make sure to select ‘.zip’.

- Double click on the new .zip file to extract its contents. You need to get 2 (if you are using a non-cellular device) or 3 (if you are using a cellular device) files from the extracted .zip file. These files are the ‘BuildManifest.plist’, the baseband (.bbfw file), and the SEP (.sep file).
Getting the BuildManifest.plist File
The ‘BuildManifest.plist’ file should be located in the folder you extracted from the ‘.zip’ file. Copy this file to the ‘Downgrade’ folder.
 Getting the Baseband File (Only for Cellular Devices)
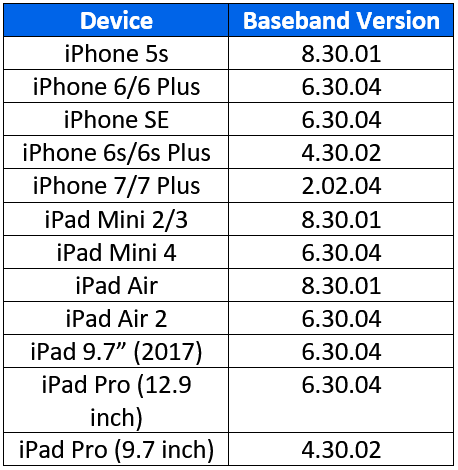
Getting the baseband is a little bit more complicated. The baseband files are located in the ‘Firmware’ folder within the extracted folder. Depending on the IPSW file you downloaded for your device, there may be multiple baseband files in this folder. If there are, you need to make sure you copy the correct one. To check which file is the correct one, you can use the table to the right. For example, if you are using an iPhone 6 Plus, the baseband version would be 6.30.04. Therefore, the baseband file would be named ‘Mav10-6.30.04.Release.bbfw’ (may begin with ‘ICE’ instead of ‘Mav’ for some devices). Once you have found the correct baseband file, copy it to the ‘Downgrade’ folder. Make sure you copy the .bbfw file and not the .plist file.
 Getting the SEP File
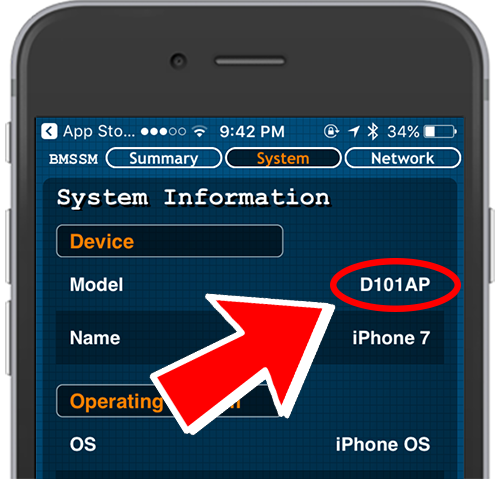
Similarly to the baseband, there are sometimes multiple SEP files in IPSW files for different devices or board configurations (which processor the device has). You need to get the correct SEP file or the restore will not work. To do this you will need to know what your devices board configuration is. You can find this using the app store app Battery Memory System Status Monitor on your device. Install it and once open, navigate to the ‘System’ tab located at the top. At the very top, it should say the ‘Model’, followed by the board configuration (e.g. D221AP). SEP files are located in ‘Firmware/all_flash/’ within the extracted folder. For example, if your board configuration is D221AP, the SEP file would be in ‘Firmware/all_flash’. In here you should find a file named ‘sep-firmware.d221.RELEASE’ with the extension ‘.im4p’. Copy this file to the ‘Downgrade folder. Make sure to copy the .im4p file and not the .plist file. - Find your iOS 11.1.2 SHSH2 blob file and move it to the ‘Downgrade’ folder. For this to work, you need to get the generator from this file to put onto the iOS device. To do this, right-click on the .shsh2 file and hover the cursor over ‘Open With’. Under this menu click ‘Other…’. From here you need to select a text editor to open the file with. TextEdit will do, but you can also use something else if you like.

- Scroll down to the bottom of the SHSH2 file (or possibly somewhere in the middle) and you should see a ‘generator’ key, followed by a string of characters. This string is the generator you need to put onto your device. Copy it and save it for later, or just keep the file open.


- Now you need to add the generator from the SHSH2 file to your device. To do this, open the NonceSet1112 app on your device. You should see the exploit running to gain root access. Once this is done, it should say ‘YES’ next to ‘Root Status’.
- Further down the page should be a box that says ‘SET/CHANGE NONCE’. In this box, you need to type or paste the generator you got from your SHSH2 blob file. Make sure to type it exactly as shown. Once done, tap the ‘return’ key on the keyboard to set the generator.
- Open the ‘Terminal’ app on your mac either by searching for it in spotlight search, or opening through Launchpad. Once open, you need to change the current directory to the one where you saved the ‘futurerestore_macos’ file. To do this type
cd <location of futurerestore_macos file>. For example:
cd /Users/Josh/Desktop/Downgrade/ - You now need to make the ‘futurerestore_macos’ file executable, so that it can be used in Terminal. To do this, simply type this command into terminal:
chmod +x futurerestore_macosYou should notice the file’s icon change to a Terminal icon if done correctly.
- Now we can actually try to restore the device. In the same Terminal window as before, type this command (replacing the parts in the ‘<>’ with your own file names):
./futurerestore_macos -t <iOS 11.1.2 SHSH2 blob> -b <Baseband file> -p BuildManifest.plist -s <SEP file> -m BuildManifest.plist <iOS 11.1.2 IPSW File>. For example:
./futurerestore_macos -t 7850667594858382_iPhone8,1_n71map_11.1.2-14C92.shsh2 -b Mav13-2.41.00.Release.bbfw -p BuildManifest.plist -s sep-firmware.n71m.RELEASE.im4p -m BuildManifest.plist iPhone_4.7_11.1.2_15B202_Restore.ipswNOTE: If you are using a non-cellular device (e.g. iPad) that doesn’t require a baseband, remove the
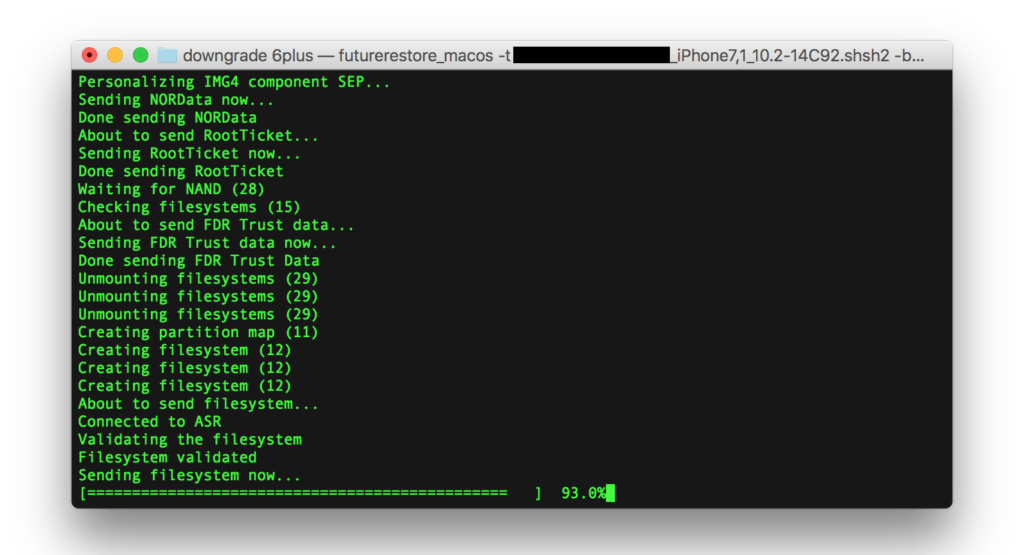
-b <Baseband file> -p BuildManifest.plistfrom the command. You will also need to add--no-basebandto the end of the command. - If you did everything correctly, and your SHSH2 blobs are valid, your device should now start to restore to iOS 11.1.2. Make sure you do not unplug your device, or close Terminal during this process. If you do, you may be forced to restore to the latest iOS version and you will no longer be able to use this method.

Video Guide
ALSO SEE: How to Jailbreak iOS 11.0 – 11.1.2 Using LiberiOS on iPhone, iPod touch or iPad


Is it possible to apply this procedure with a jailbroken iPhone 6 running iOS 11.1.1? I have also stored the blobs for this same version.
Today I give you good news for so long people have Searched for answers to their respective questions but to no avail so therefore i bring you the problem solver of time, she deals with anything that deals with hacking ,spying, account configuration, data recovery, credit card top up, wire transfer,etc. He has been tested and labeled number one on this site. You can only have her via gmail ,
HACKSUCCES804@GMAIL.COM
Im stuck to chmod +x and it wont create executable file in terminal. any help would be greatly apreciated. Thanks
my iphone 6 is on ios 11.1.1 and jailbroken.And i have also saved the blobs for it for ios 11.1.1.can i still use this method.
Yes
OMG..Thanks for the response bro.Really appreciate that.btw there is futurerestore version for windows.can i continue on that one or should i go to mac os???
Thanks again bro for the response.Love u:)
sir i am having an error that says that failed to load the SEPManifest error code=-14.Sir Please reply:(
never mind bro ive restored my device successfully on windows version of futureretore.I am like the happiest person ever 🙂 Thanks again 🙂
Did not work for me when I manually set the SEP file, have to use this code to work.
./futurerestore_macos -t –latest-sep –latest-baseband
I have iphone 6s n i have all blobbs since from ios 10.1 to 11.2.6 in this method can i restore my device to 11.1.2 ????? Even i also set the nonce n i m using nonceap too is that any problem if i delete nonceap or i will get boot loop if i delte nonceap from my device please help me????
My ios 11.1.2
My Baseband iphone 7+ is 2.01.03 i can Restore To 11.1.2
With this baseband thenx.
for iPhone 8 plus tss server not have a shsh for iOS 11.1.2, I would to restore my iPhone 8 plus, with iOS 11.1.2, but I don’t know to do this without shsh for iOS 11.1.2.
Unfortunately, if you didn’t save the blobs when iOS 11.1.2 was signed by Apple you can no longer get them. They are required for this restore method.
Wich is Baseband File for iPhone X? Thanks.
1.02.03
Would it work 100% if I restored 11.1.2? Because I don’t want to force update my phone. Thanks 🙂
If you have SHSH2 blob for 11.1.2 and you follow everything correctly it should work fine.
Thanks for the response 🙂 So I can restore 11.1.2 without any problems? Happy New Year!